In this tutorial, we will take a look at the process of importing costs into Google Analytics 4 using the SFTP method.
The goal of this article is to present a way to automatically import cost data from marketing channels other than Google Ads into GA4. The result will be to have all the advertising data in one place and be able to create advanced reports directly in GA4.
How does it all work? #
The whole cost import consists of 5 phases.
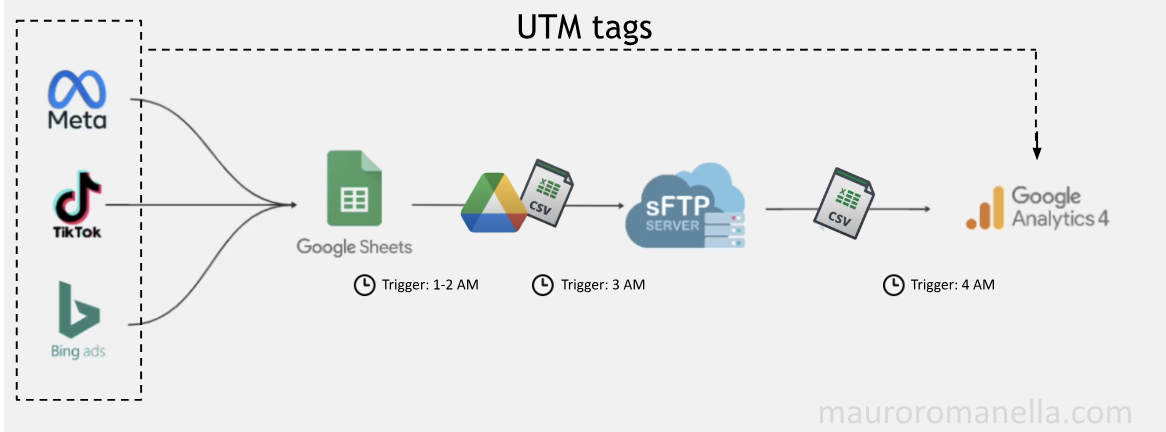
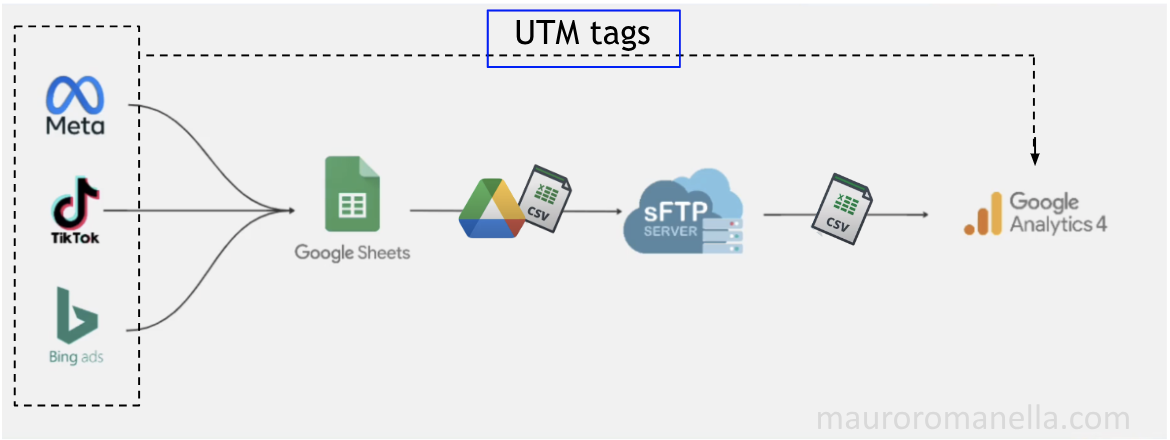
Phase 1: Adding the UTM parameters in the URLs of your advertisements.
Phase 2: Importing the cost data to Google Sheets.
Phase 3: Saving the data into Google Drive in the required format (.csv).
Phase 4: Creating a sFTP server account and uploading the cost data file to it.
Phase 5: Linking and Uploading data from server to GA4.
Before you start #
This approach, utilising Google App Script or Google Sheets Add-on for data import and an SSH hosting server, is just one of several methods available for automating the import of cost data into GA4.
Alternatively, if Python is your preferred programming language, I highly recommend Ahmed Ali’s method, which leverages Google Cloud as Server and Python for data import.
However, regardless of the method you choose, the general logic remains the same due to specific requirements imposed by Google Analytics 4:
Google Analytics 4 permits the configuration of only one data cost import.
Google Analytics 4 allows data import automatisation only via sFTP.
Google Analytics 4 requires submission of a file in .CSV or .TSV format .
Google Analytics 4 requires that the headers in your CSV file match with the column mapping.
Google Analytics 4 requires that the campaign id’s in the imported CSV file must match to the Campaign ID’s forwarded through utm_id.
Every point will be clarified in the following guide.
So, let’s start
Adding the UTM parameters #
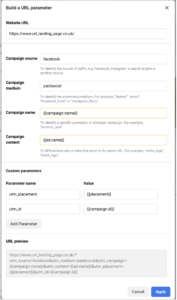
In a previous article, I explained the concept and use of the UTM tags. If you are unfamiliar with UTM tags, I recommend referring to that article to gain a better understanding of their purpose and how they can be utilised.
Setting up the UTM tags represents the necessary prerequisite step for importing the campaign data into GA4.
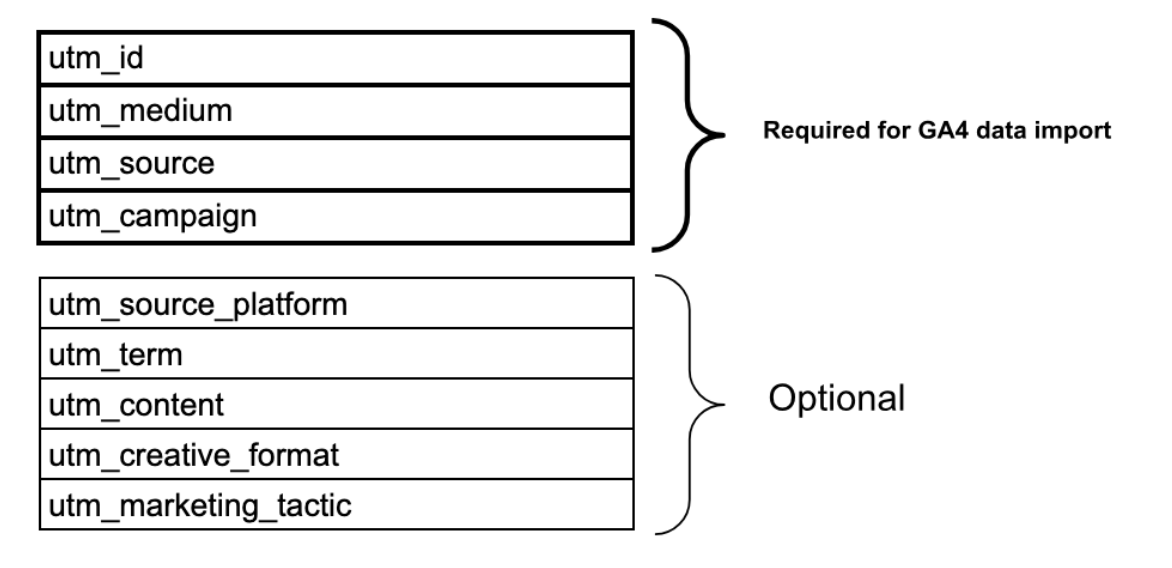
There are 4 parameters you must add to your ad URLs:
utm_id (campaign ID)
utm_source (campaign source)
utm_medium (campaign channel)
utm_campaign (campaign name)
You may be familiar with the conventional UTM tags (utm_source, utm_medium, utm_campaign), however, the utm_id tag might be something you’ve never heard or used before.
Well, Now is the time to get to use it!
GA4 won’t be able to merge two datasets without a Campaign ID.
As per Google utm parameters guideline, in Google Analytics 4, it has become mandatory to use the utm_id tag for importing advertising cost data.

Important:
GA4 cost data import relies on utm_id to import the data and this is the major limitation of GA4 data import. Imagine you run a Facebook campaign that receives a substantial number of impressions or clicks, but none of the users who interacted with the ad land on your website. As a result, you won’t have the corresponding “utm_id” recorded in your analytics. Consequently, you won’t be able to import any data from these ads into your Google Analytics account. Despite having a significant number of impressions and related costs for these ads, you cannot import this data into Google Analytics, leading to a discrepancy between your actual costs and the reported data. This mismatch makes it impossible to accurately calculate the Return on Advertising Spend (ROAS) in Google Analytics 4.

Importing the cost data to Google Sheets #
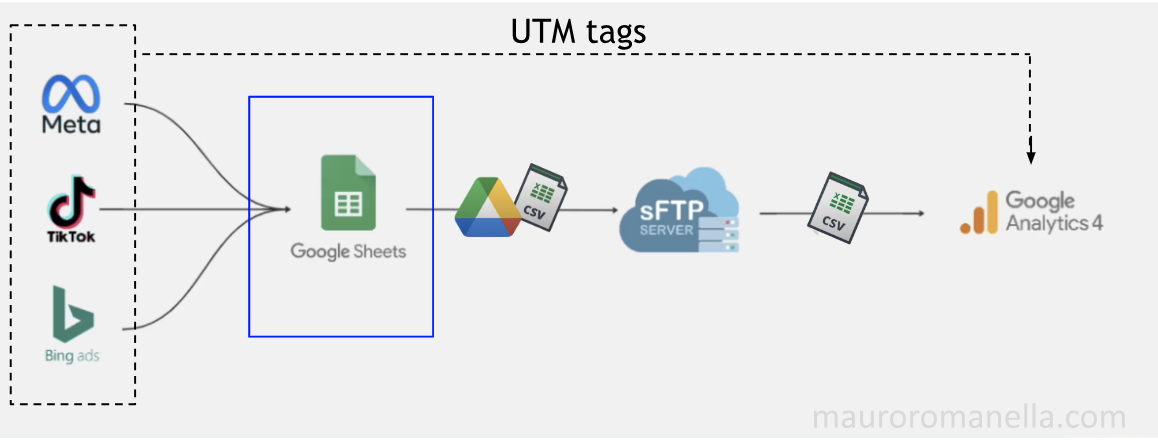
In this step we want to get the data from Meta, Bing, TikTok, etc. to Google sheets.
So, in a sheet, we will have the advertising data stored as follows:
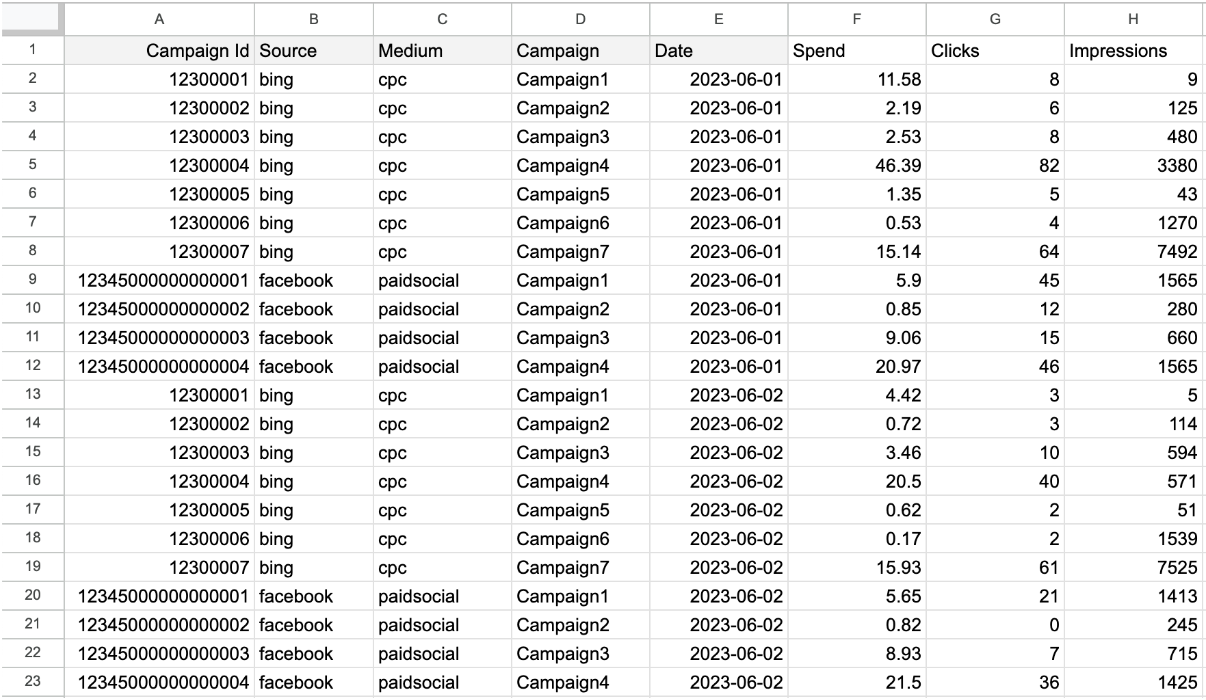
As you can see, the Bing and Meta campaigns data are merged in one sheet. This is because Google Analytics 4 allows configuring only one data cost import. So, if you want to import data from multiple sources, make sure that the data are appropriately consolidated and merged into a single sheet.
To achieve this you can:
Use Supermetrics, Dataslayer or similar tools.
Develop a script that works with APIs.
Alternatively,
While I do recommend considering developing your own tool, it is important to keep in mind that there are pros and cons to this approach.
PRO
CONTRO
We use the script even though we have the highest plan in Supermetrics. Why? Because it is super easy to use and scalable.
Regardless of the method you choose, in order to automate the process, don’t forget to set a trigger, ideally for 1-2 AM, every day.

Due to the nature of Google Analytics 4 data import, where the new data overwrites the previous data during imports from a CSV file, it is necessary that the historical data is retained and to append the daily data to the previous data.
For example:
-
Day 1: import in GA4 this .CSV file.

-
Day 2: import in GA4 this .CSV file.

If you do not keep the data of Day 1 in the CSV file imported the day 2, the day 1 data will no longer be present in GA4 either.
Saving the data into Google Drive #
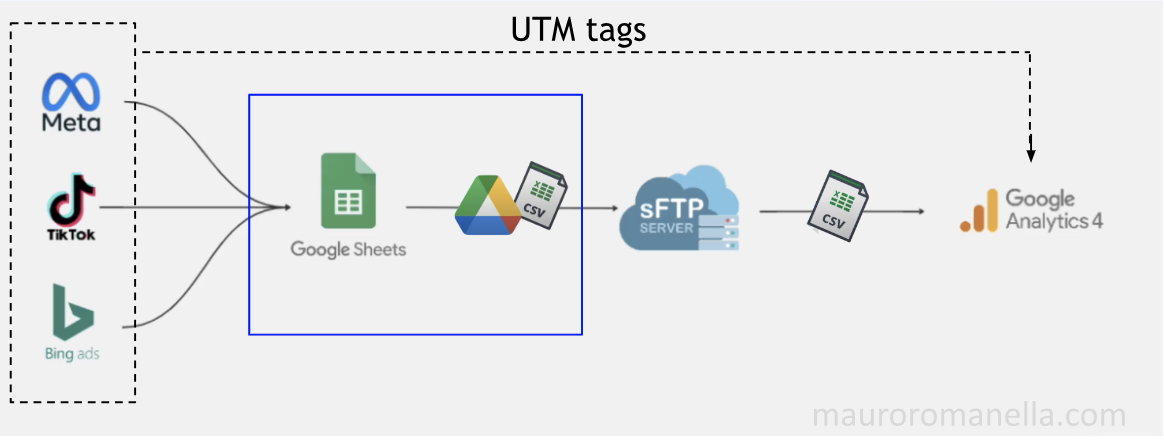
When it comes to importing cost data into Google Analytics 4 (GA4), the supported format is limited to .CSV (or .TSV) file.
Since Google Apps Script only supports HTTP requests, it’s NOT possible to directly upload file on the server.
To overcome this limitation, a two-step process is required. First, we save the Google Sheet as a .CSV file on Google Drive using the following Google Apps Script code:
function saveSheetAsCSV() {
  var folderId = "YOUR_FOLDER_ID"; // Replace with your folder ID
  var fileName = "cost_data.csv"; // Feel free to replace with your desired file name

  // Get the folder by ID
  var folder = DriveApp.getFolderById(folderId);

  // Check if a file with the same name already exists in the folder
  var existingFiles = folder.getFilesByName(fileName);
  if (existingFiles.hasNext()) {
    // Delete all existing files with the same name
    while (existingFiles.hasNext()) {
      var file = existingFiles.next();
      file.setTrashed(true);
    }
  }

  // Convert active sheet to CSV format
  var csv = convertSheetToCSV();

  // Create a new file with the desired name and content in the specified folder
  var file = folder.createFile(fileName, csv, MimeType.CSV);
  Logger.log("File saved: " + file.getName());
}

function convertSheetToCSV() {
  var sheet = SpreadsheetApp.getActiveSpreadsheet().getActiveSheet();
  var values = sheet.getDataRange().getDisplayValues();

  var csvContent = "";

  for (var row = 0; row < values.length; row++) {
    for (var col = 0; col < values[row].length; col++) {
      var cellValue = values[row][col];

      // Add quotes to cell value if it contains a comma
      if (cellValue.indexOf(",") !== -1) {
        cellValue = '"' + cellValue + '"';
      }

      csvContent += cellValue;

      // Add comma separator between cells
      if (col < values[row].length - 1) {
        csvContent += ",";
      }
    }

    csvContent += "\n"; // Add new line after each row
  }

  return csvContent;
}
To use this script:
Replace `"YOUR_FOLDER_ID"` with the actual folder ID where you want to save the file.

Enable all required permissions.
This script will convert the active sheet to CSV format and save it as a new file in the specified folder. If there are existing files with the same name in the folder, they will be deleted before saving the new file with the updated content.
In order to automate the process, don't forget to set a trigger, ideally for 2-3 AM, every day.
So, At this point we have 2 triggers:
The first trigger runs at 1-2 am and imports the ads data in the sheet.
The second trigger runs at 2-3 am and downloads the sheet as a .CSV file on Google Drive.
Uploading cost data to server #
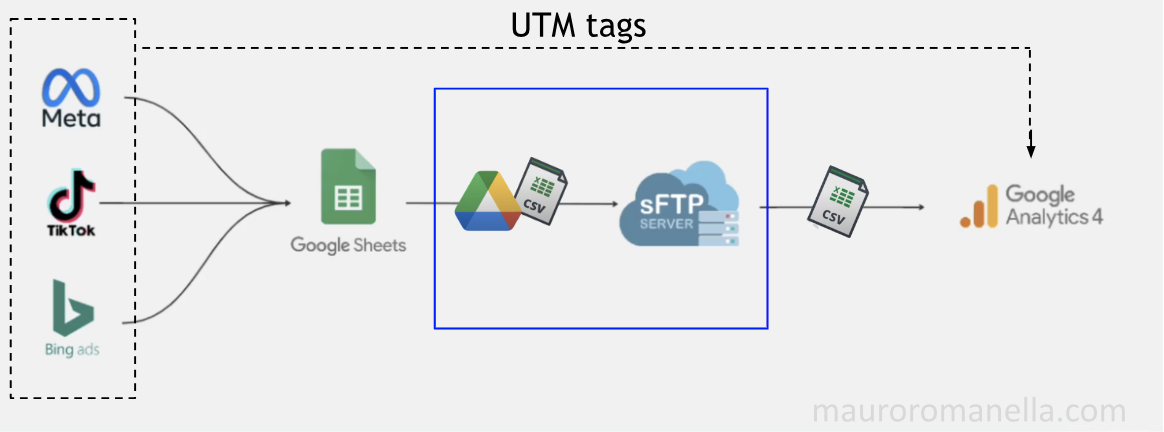
Now we will go a step further and upload the .CSV file downloaded from Google Drive to our server on a daily basis.
To achieve this we will:
Create a sFTP Server.
Create a FTP account.
Upload costs from Google Drive using Make.com.

The same result can be accomplished in several ways. Another possible way could be using App Script and PHP:
You can pass the Google Drive download link of the CSV file to a PHP script via either GET or POST method. The PHP script will handle the file upload process on your hosting server. By retrieving the file using the provided link, the PHP script can save the .csv file to the desired location on the hosting.
Create a sFTP server #
Since GA4 only allows automated upload of cost data via sFTP, it is necessary to provide an sFTP server.
What is an SFTP server? … You can find many definitions of what "sFTP" actually is on the internet. However, for our purposes, it is sufficient to know that it represents a secure way to transfer files between servers.
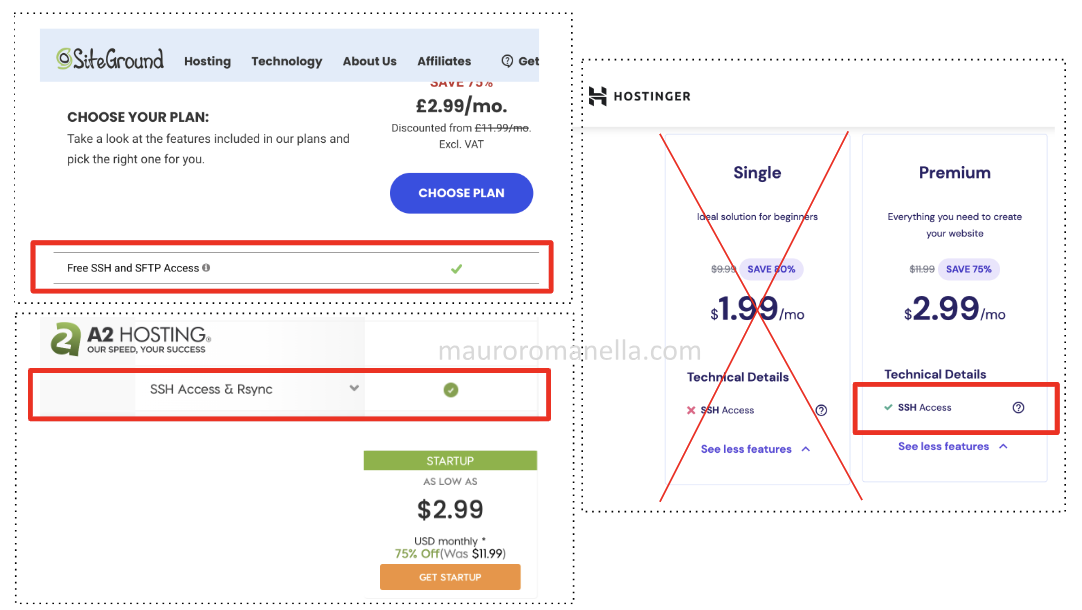
Which sFTP server to choose? … You can use any sFTP server that supports SSH access.
If you are unsure whether your current hosting provider offers this feature, I recommend reaching out to your developer.
Otherwise, you can explore different hosting options. Usually such functionality is included in premium plans that typically start at $2.99 per month.

Create an FTP account #
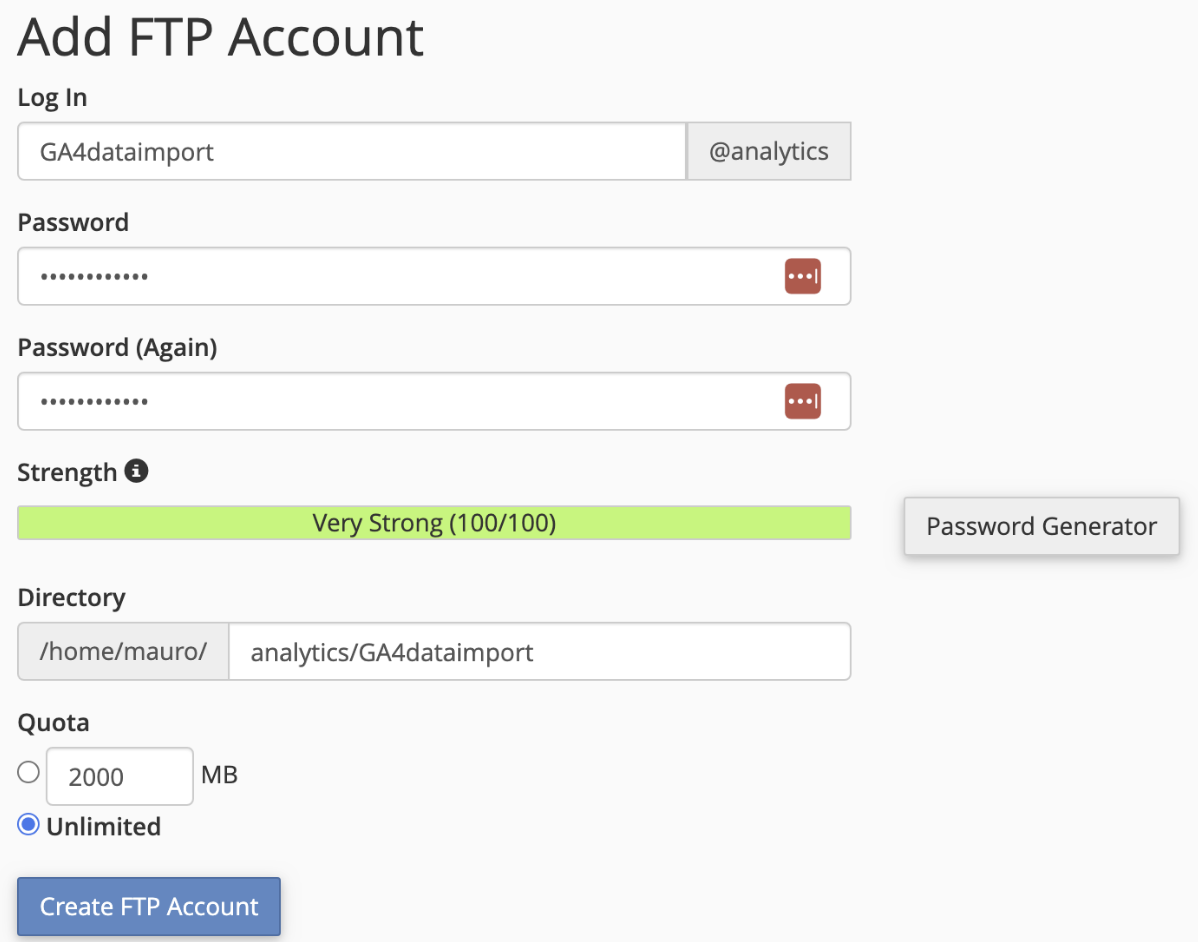
The process of creating an FTP account can be different depending on your hosting provider. However, the majority of them are based on cPanel or similar control panel so the following process can be applied to most of them:
First log in to cPanal.
Find and Click on ‘FTP Accounts’.
Fill in the log in, e.g. "GA4dataimport"
Fill in the password (you can use the provided password generator) - but save the password carefully.
Click “Create FTP Account”
Subsequently, a new window will open with a request to create an FTP account
The whole setup should look like this:
Create a Make.com account #
At this moment, we have created an FTP account to which we will upload costs from Google Drive.
Tho do that we can use Make.com an automation tool, user-friendly, and it's free.
- Creating an account on make.com (FREE TRIAL is enough).
- Go straight to the "Scenarios" section.
IMG
- Then click on "Create your first scenario".
IMG
- Once you are in the Scenario editor, click on all these 3 modules, according to the pattern:
- In the first step, we use the Google Drive Search for Files/Folders module, in which we click the path to our Google Drive folder with .CSV loads, it looks like this:
IMG
- The second step is to use the Google Drive Download and File module to download individual files, its configuration will be as follows:
IMG
- In the third step, we select the FTP Upload and File module for gradual upload of files to FTP:
IMG
- In the first step, we use the Google Drive Search for Files/Folders module, in which we click the path to our Google Drive folder with .CSV loads, it looks like this:
- In the last step in this section, we run the entire Scenario and the result should be a gradual upload of individual .CSV files -> the result looks something like this:
IMG
- Don't forget to set the automatic trigger again, I recommend for 3 o'clock in the morning:
IMG
At this moment, you should have .CSV files uploaded to the FTP server, you can check it through the file manager:
IMG
Find a specific folder there, according to your created FTP account:
Linking and uploading costs to GA4 #
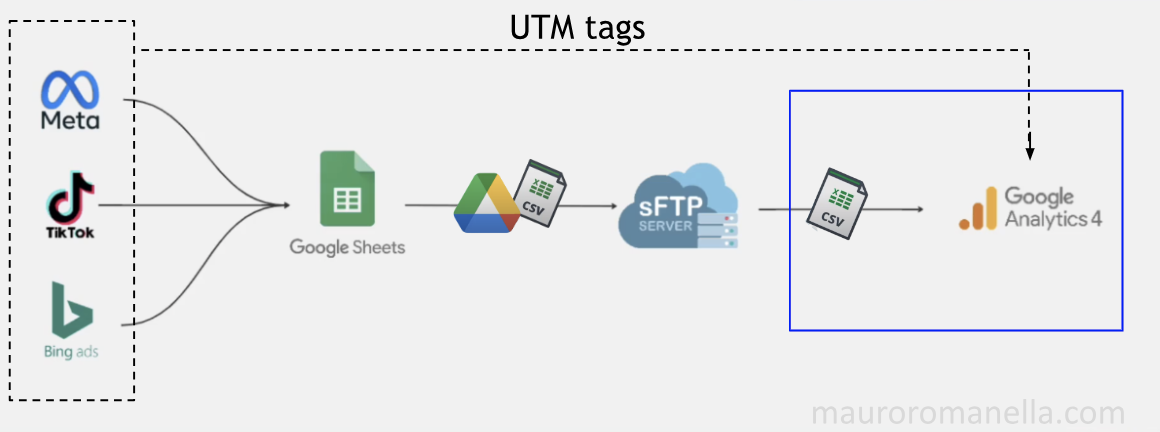
Now it's time to upload this cost data to GA4.
To achieve this we need:
- Create a data import in GA4
- Connect GA4 to the server with an SSH key.
Create a data import in GA4 #
- Go to the Admin panel of your GA4 account, select Data Import then click on ‘Create data source’.

- Give your data source a name then select ‘Cost Data’ as data type.
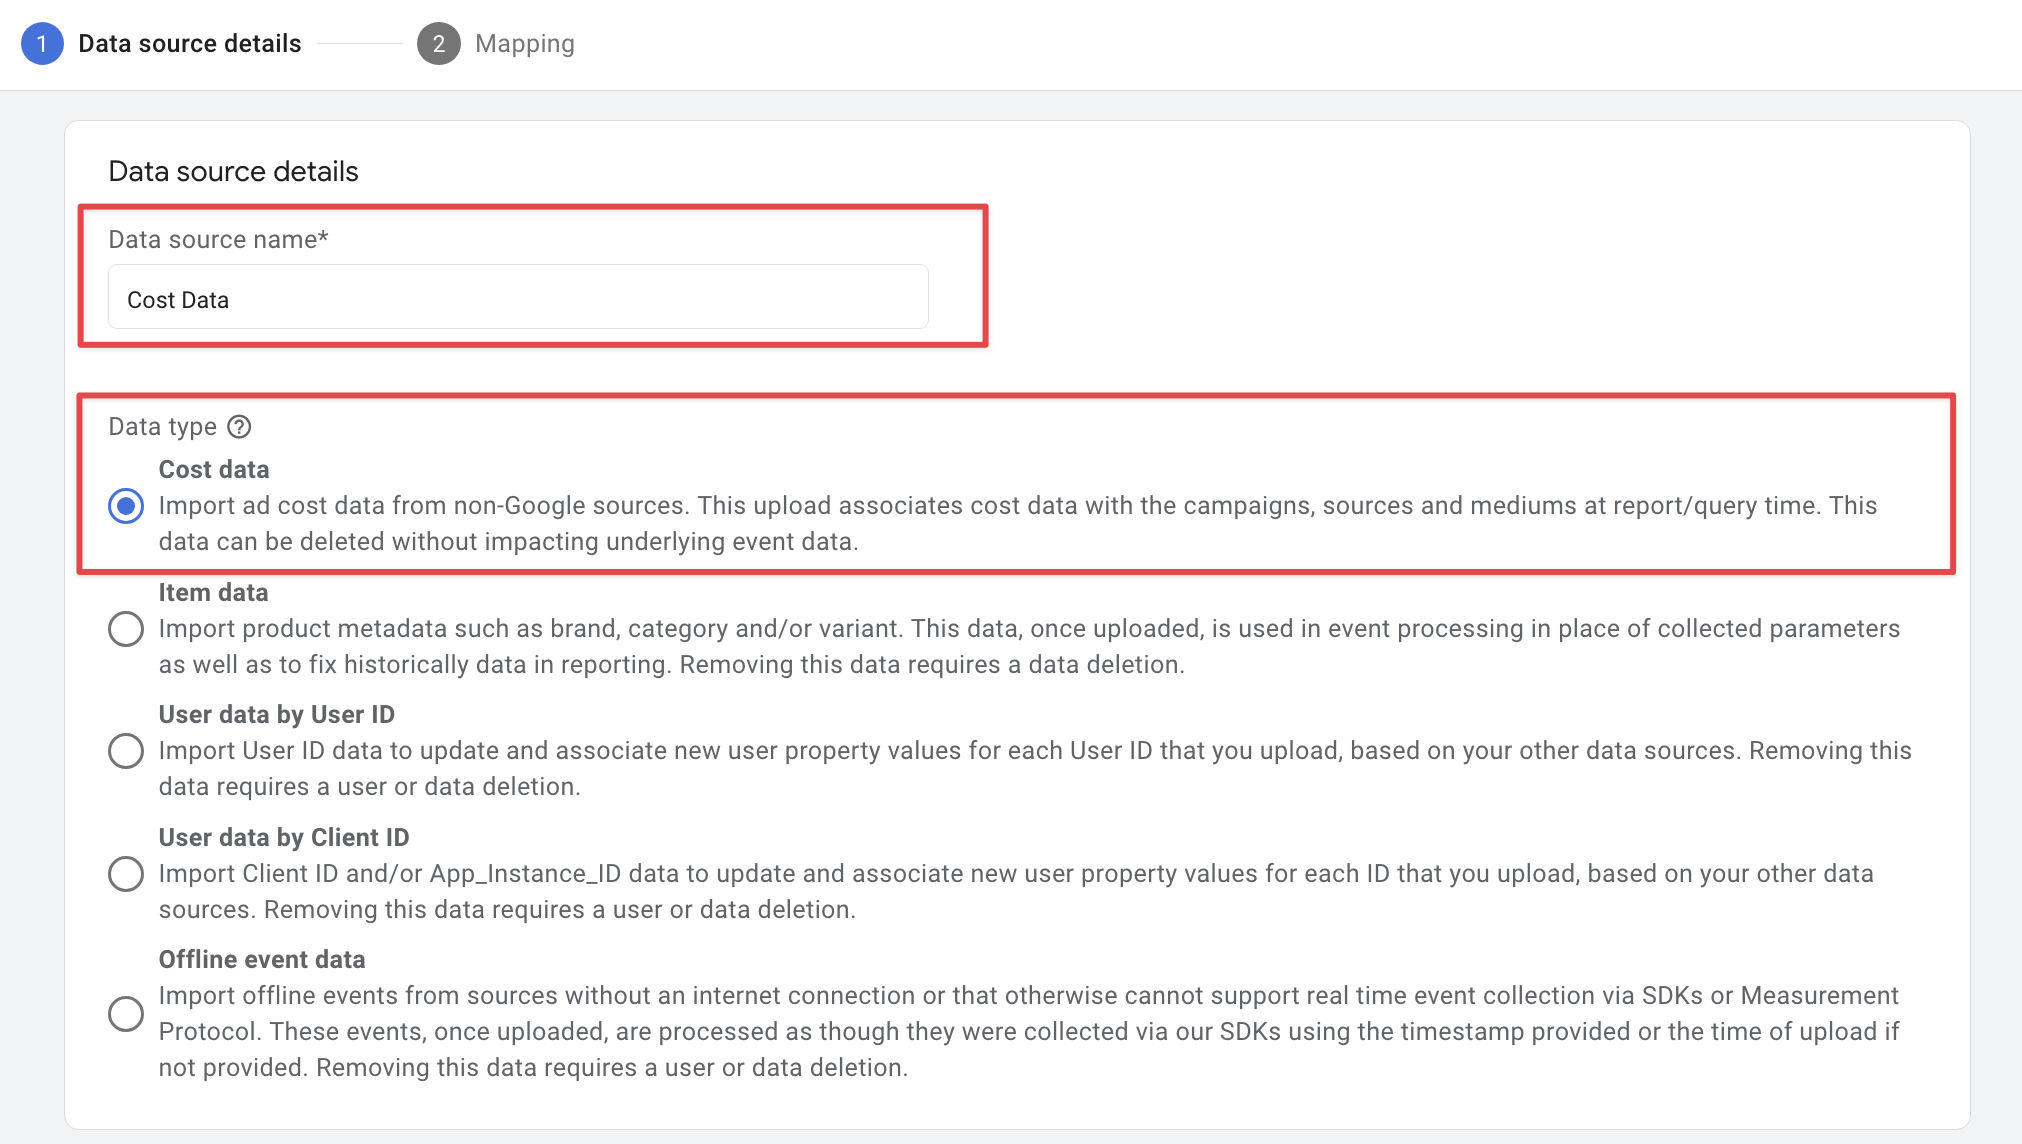
- Select ‘SFTP’ as import method and fill in the details for the SFTP configuration:
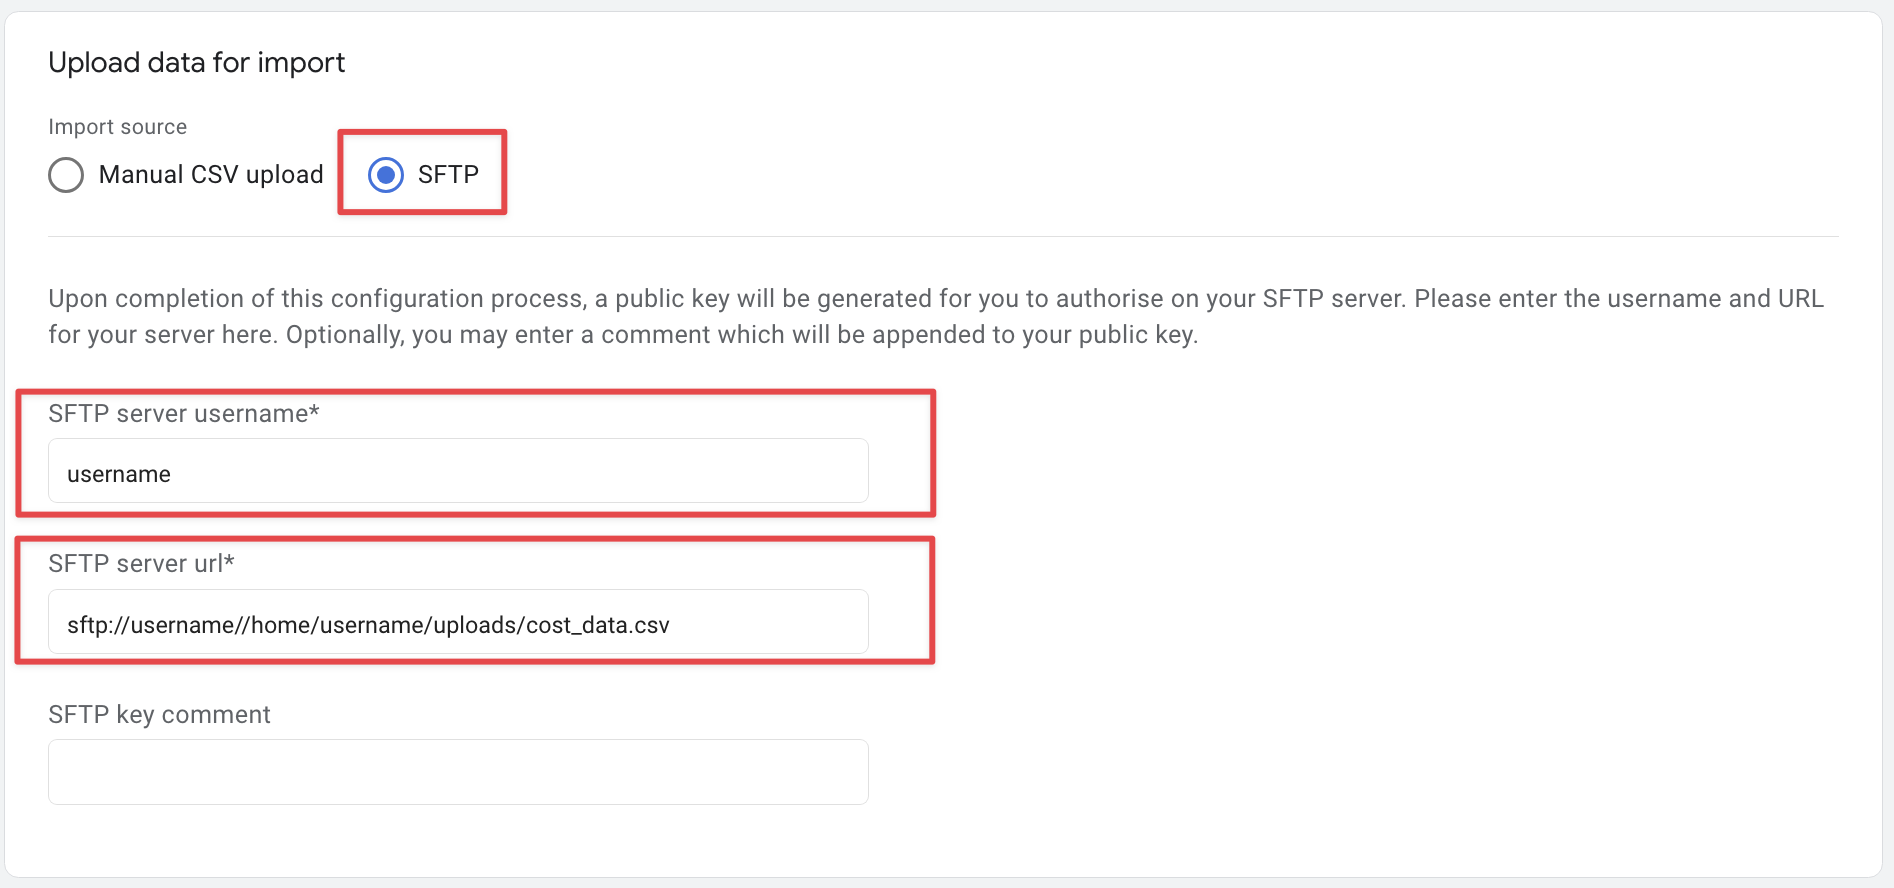
- Username: Enter the username that you created when setting up the server.
- Server URL: For simplicity, I have developed a sFTP URL Builder Tool that will generate the given URL for you.
- Leave the SFTP key comment blank.
- Set the schedule for data import ‘Daily’ for 03:00 – 04:00 (so that the previous scripts and uploads have time to run before the data import into GA4).

Click on ‘Next’ to proceed to the next step.
- Finally, click on 'Create & Generate Key' to create the data source and generate the public key required for authentication.
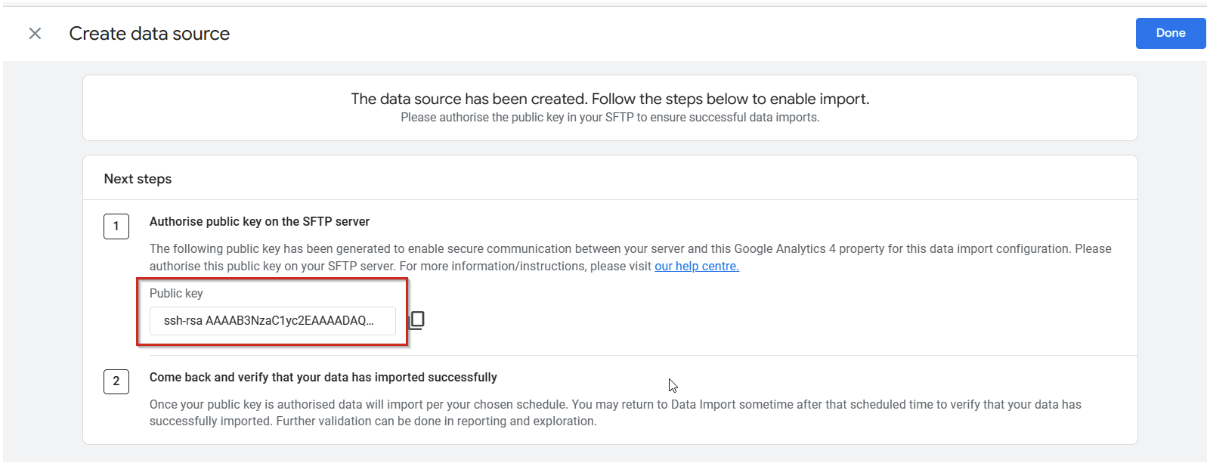
Connect GA4 to the server with an SSH key. #
- First log in to cPanal.
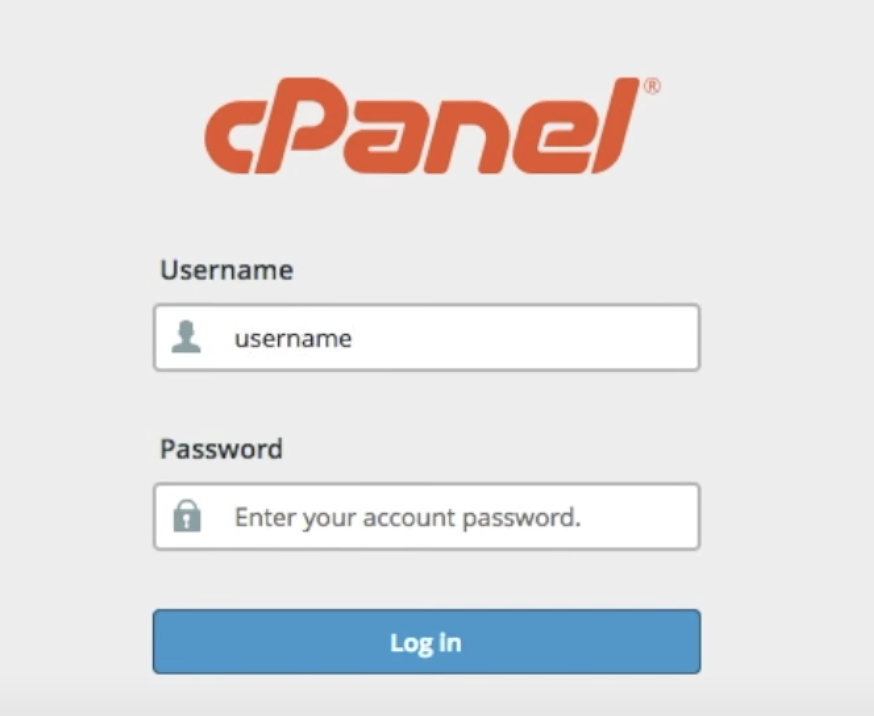
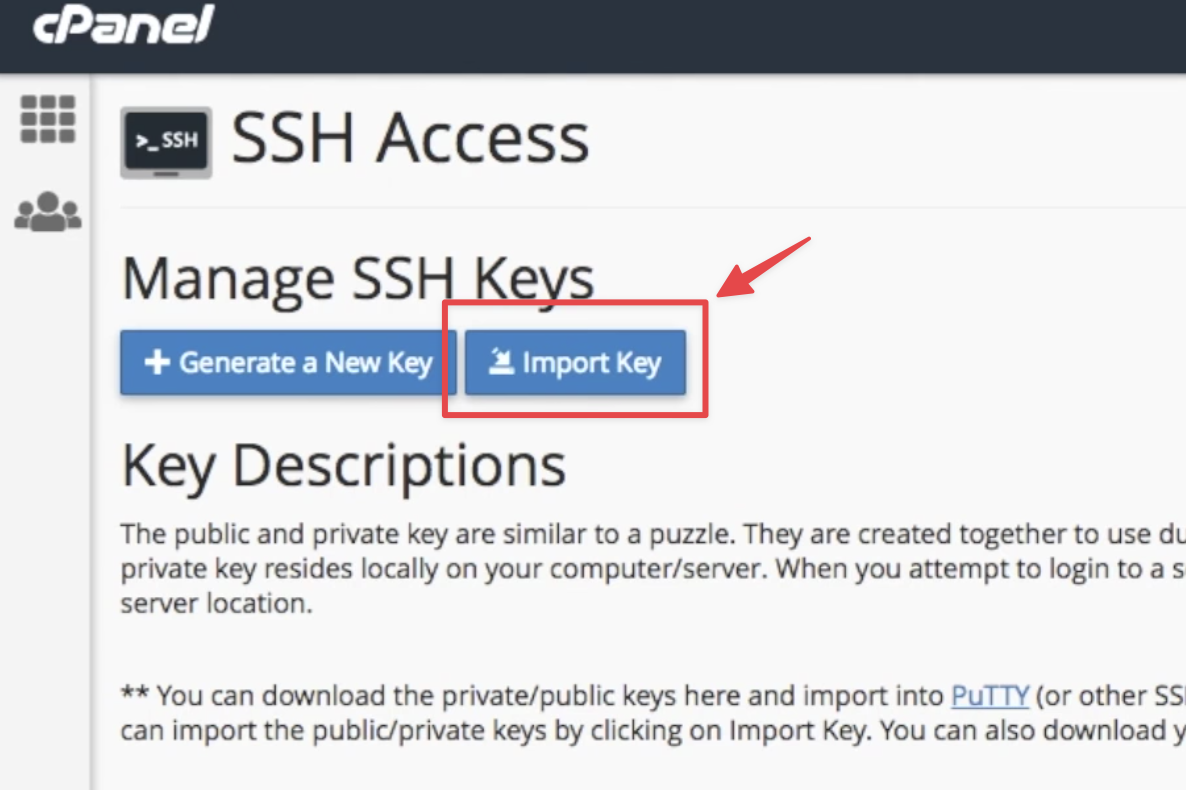
- Find and Click on ‘SSH Access’ then ‘Manage SSH Keys’.

- Then ‘Manage SSH Keys’.
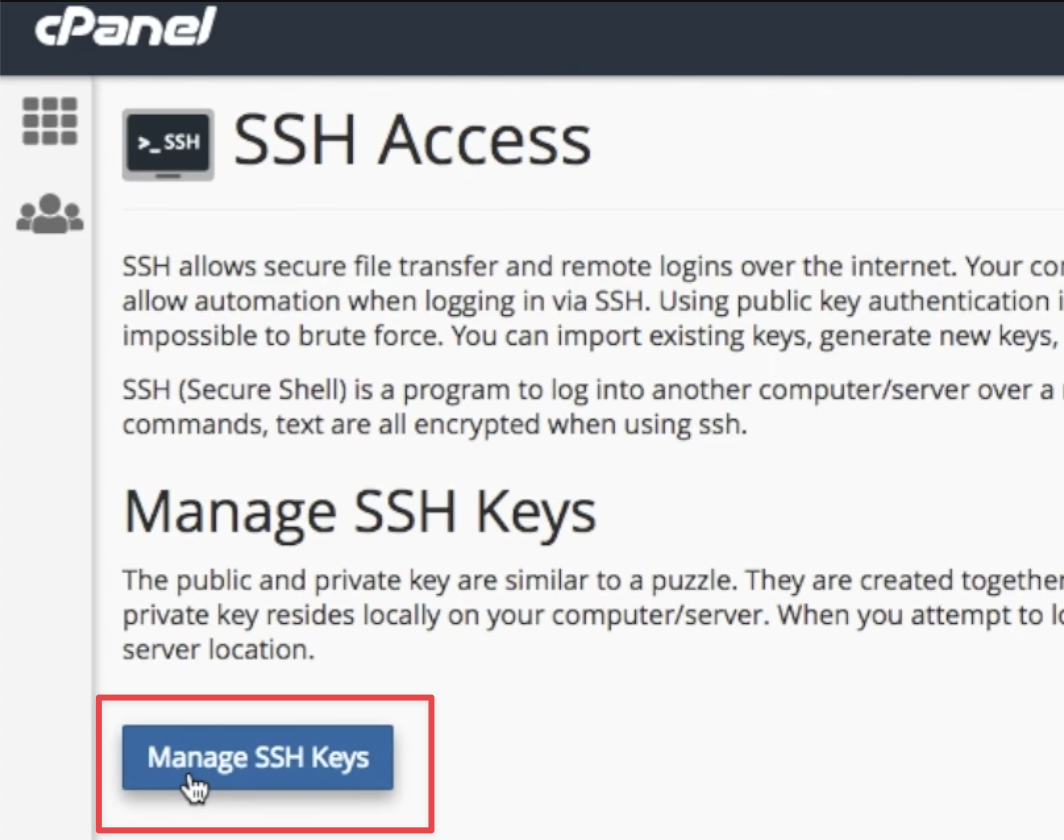
- Next, click on ‘Import SSH Keys’.
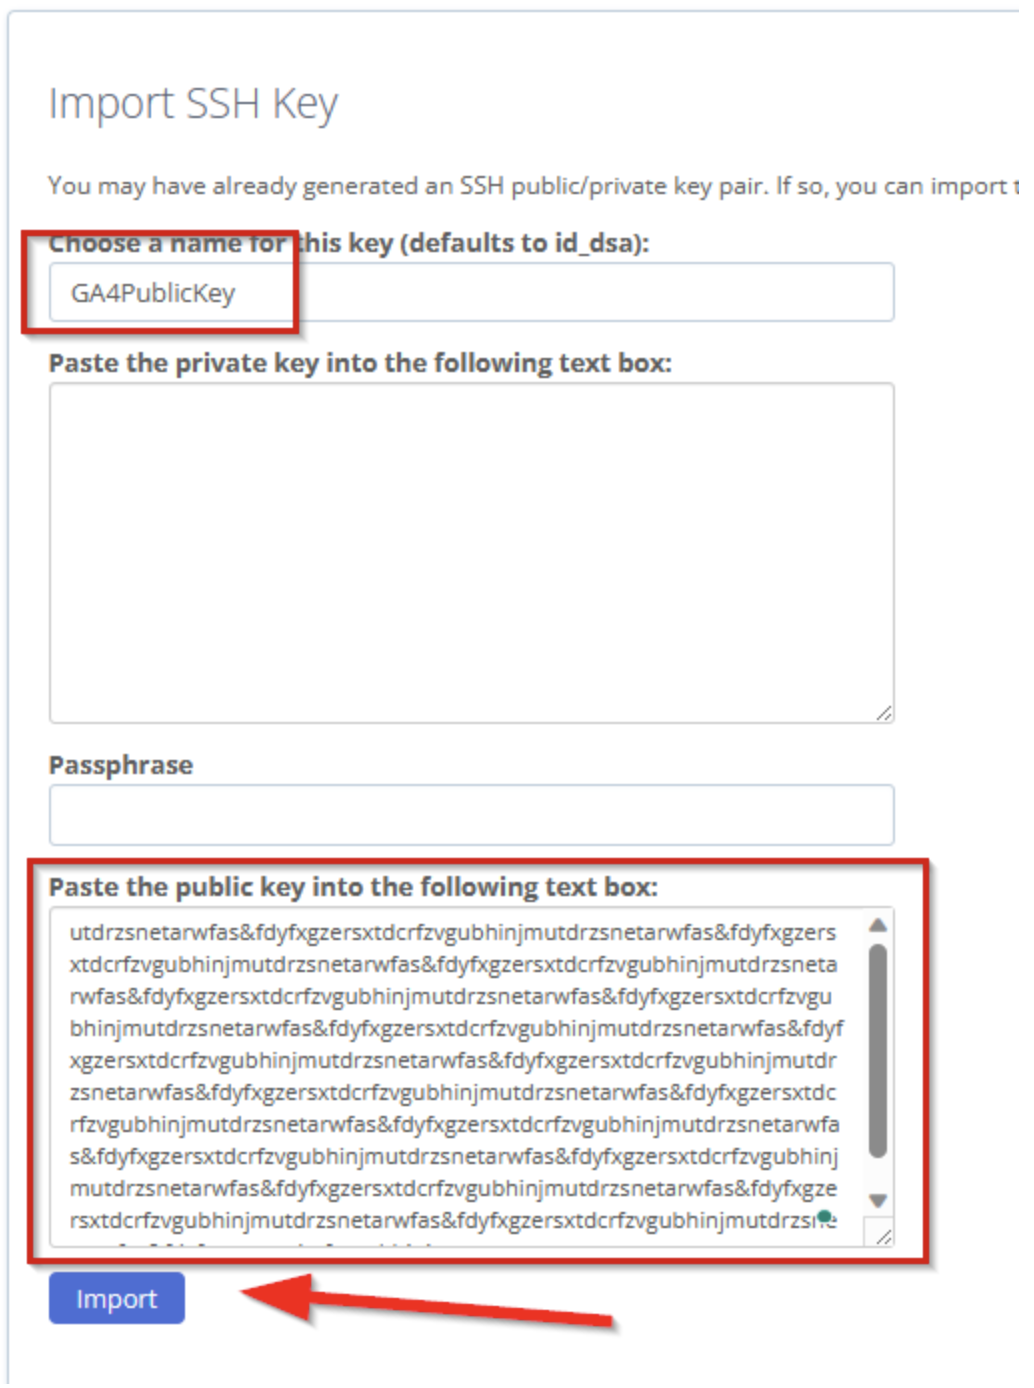
- A form will open up to fill out:
- In the ‘Choose a name for this key’ field, enter the name you want to store the key under.
- In the ‘Paste the public key into the following text box’ box, paste the public key from Google Analytics 4.
- Leave the other fields blank and save by clicking ‘Import’.
- Select the key you have imported, and at the end of the line, click ‘Manage’.

- Authorize the key by clicking on ‘Authorize’.
The status of the key (authorized) will be displayed next to its name.

In this step, the public key is imported but still needs to be authorised.
With this, the SFTP server is ready, and Google Analytics 4 can now connect and download the cost import file.

